- 05 Sep 2024
- 9 Minutes to read
- Print
- DarkLight
Configuring an iNode to Use Web Proxy
- Updated on 05 Sep 2024
- 9 Minutes to read
- Print
- DarkLight
Your iNode's uplink may be connected to a network that restricts access to internet by requiring traffic to pass through a proxy server. You can configure the iNode so that all HTTP/S traffic originating from it flows through the proxy server.
In this section, learn how to configure an iNode to use a proxy server using either the CLI or web UI, troubleshoot any issues you have, and clear the proxy configuration.
If the iNode network setting Default Destination is set to WAN Network, the iNode proxy configuration can’t be applied to internet traffic originating from:
Services running on the iNode
Devices in the local network behind the iNode
Before you start, you need a transparent forward proxy server that is reachable in the network where the iNode is deployed.
Configure your iNode to Use a Proxy Server with the CLI
To configure your iNode to use a proxy server using the iNode CLI, follow these steps:
Use SSH to connect to the iNode. (Learn how in Accessing an Edge iNode Console Using the Command-Line Interface.)
Before configuring the proxy, first check iNode's uplink connectivity using the httping command.
For example:Shell
> httping --count 5 http://www.httpbin.org
PING www.httpbin.org (52.73.47.183), Method: GET, DNSLookup: 0.0025 ms
HTTP Response seq=0, request canceled while waiting for connection (Client.Timeout exceeded while awaiting headers)
HTTP Response seq=1, request canceled (Client.Timeout exceeded while awaiting headers)
HTTP Response seq=2, request canceled while waiting for connection (Client.Timeout exceeded while awaiting headers)
HTTP Response seq=3, request canceled (Client.Timeout exceeded while awaiting headers)
HTTP Response seq=4, request canceled while waiting for connection (Client.Timeout exceeded while awaiting headers)

--- www.httpbin.org HTTP ping statistics ---
5 request transmitted, 0 replies received, 100% requests failed
rtt min/avg/max = 0.00/0.00/0.00 ms

 > httping --count 5 https://www.httpbin.org
PING www.httpbin.org (52.73.47.183), Method: GET, DNSLookup: 0.0019 ms
HTTP Response seq=0, request canceled while waiting for connection (Client.Timeout exceeded while awaiting headers)
HTTP Response seq=1, request canceled (Client.Timeout exceeded while awaiting headers)
HTTP Response seq=2, request canceled while waiting for connection (Client.Timeout exceeded while awaiting headers)
HTTP Response seq=3, request canceled (Client.Timeout exceeded while awaiting headers)
HTTP Response seq=4, request canceled while waiting for connection (Client.Timeout exceeded while awaiting headers)

--- www.httpbin.org HTTP ping statistics ---
5 request transmitted, 0 replies received, 100% requests failed
rtt min/avg/max = 0.00/0.00/0.00 ms
In the preceding example, HTTP/S traffic is blocked because the iNode is not yet configured to use proxy.
To configure the proxy server, use the set proxy to enter proxy command mode:
Shell
> set proxy
(set proxy) >
Use the server command in proxy command mode as follows:
Shell
server [PROTOCOL PROXY_ADDR]

        A proxy server is a server that acts as an intermediary for requests from a
        client (this device) and a server (resources that this device accesses) on
        the internet.

        If your network provides a HTTPS proxy server to access resources in
        the public internet, then this command MUST be invoked to configure the proxy
        server address so that various system modules can reach out to the IoTium
        Cloud Orchestration Service.


        All following examples assume :
        -  Proxy server address: 192.168.1.2
        -  Proxy server port: 5959 (if applicable)
        -  Proxy server username: proxyuser (if applicable)

        To configure a HTTPS proxy server with no Proxy Auth, and default port:
            server https http://192.168.1.2

        To configure a HTTPS proxy server with no Proxy Auth, and a custom port:
            server https http://192.168.1.2:5959

        To configure a HTTPS proxy server with Proxy Auth, and a custom port:
            server -p https http://[email protected]:5959
            Enter Proxy Password:


        For a protocol - https - only one proxy configuration is permitted.
        This command may be used to overwrite/replace an existing proxy configuration
        for a protocol (http or https).


**** This command requires a SYSTEM REBOOT to effect changes. ****
Save the configured proxy with the save command:
Shell
(set proxy) > save
*** Proxy config saved ***
*** Do a SYSTEM REBOOT to effect the changes ***
Exit the proxy command mode:
Shell
(set proxy) > exitReboot the node for the proxy change to take effect:
Shell
> rebootOnce the iNode reboots, all HTTP/S traffic originating from the iNode will be routed through the configured proxy server.
In the example that follows, see the command for a HTTPS proxy server with FQDN (fully qualified domain name) that does not require authentication and a custom port:Shell
> set proxy
 (set proxy) > server https http://testproxy.iotium.io:3128
(set proxy) > s
*** Proxy config saved ***
  *** Do a SYSTEM REBOOT to effect the changes ***
(set proxy) > q
> reboot
In the following example, the proxy server requires authentication and a custom port:
Shell
(set proxy) > server https http://[email protected]:3128
Enter proxy server password for user 'iotium':
(set proxy) > s
*** Proxy config saved ***
 *** Do a SYSTEM REBOOT to effect the changes ***
(set proxy) > q
> reboot
Check the proxy configuration buy using the following command:
Shell
> show proxyIn this example, the proxy server with a fully qualified domain name (FQDN) doesn’t require authentication:
Shell
  PROTOCOL |        HOST         | PORT | USERNAME
-----------+---------------------+------+-----------
  https    | testproxy.iotium.io | 3128 |
This is an example in which the proxy server requires authentication:
> show proxy
  PROTOCOL |        HOST         | PORT | USERNAME
-----------+---------------------+------+-----------
https | testproxy.iotium.io | 3128 | iotium
To verify that the proxy configuration is working, use the httping command as
follows:Shell
> httping --count 5 http://www.httpbin.org
PING www.httpbin.org (52.201.109.155), Method: GET, DNSLookup: 0.0076 ms
HTTP Response seq=0, proto=HTTP/1.1, status=200, size=9593 Bytes, time=233.159 ms, connection=0.000 ms, TTFB=232.995 ms
HTTP Response seq=1, proto=HTTP/1.1, status=200, size=9593 Bytes, time=230.365 ms, connection=0.000 ms, TTFB=230.173 ms
HTTP Response seq=2, proto=HTTP/1.1, status=200, size=9593 Bytes, time=297.235 ms, connection=0.000 ms, TTFB=297.020 ms
HTTP Response seq=3, proto=HTTP/1.1, status=200, size=9593 Bytes, time=233.307 ms, connection=0.000 ms, TTFB=233.093 ms
HTTP Response seq=4, proto=HTTP/1.1, status=200, size=9593 Bytes, time=234.866 ms, connection=0.000 ms, TTFB=234.372 ms

--- www.httpbin.org HTTP ping statistics ---
5 request transmitted, 5 replies received, 0% requests failed
rtt min/avg/max = 230.36/241.71/297.23 ms


 > httping --count 5 https://www.httpbin.org
PING www.httpbin.org (52.73.47.183), Method: GET, DNSLookup: 0.0074 ms
HTTP Response seq=0, proto=HTTP/1.1, status=200, size=9593 Bytes, time=228.282 ms, connection=0.000 ms, TTFB=228.089 ms
HTTP Response seq=1, proto=HTTP/1.1, status=200, size=9593 Bytes, time=231.744 ms, connection=0.000 ms, TTFB=231.626 ms
HTTP Response seq=2, proto=HTTP/1.1, status=200, size=9593 Bytes, time=228.542 ms, connection=0.000 ms, TTFB=228.424 ms
HTTP Response seq=3, proto=HTTP/1.1, status=200, size=9593 Bytes, time=228.146 ms, connection=0.000 ms, TTFB=228.001 ms
HTTP Response seq=4, proto=HTTP/1.1, status=200, size=9593 Bytes, time=228.340 ms, connection=0.000 ms, TTFB=228.125 ms

--- www.httpbin.org HTTP ping statistics ---
5 request transmitted, 5 replies received, 0% requests failed
rtt min/avg/max = 228.15/228.74/231.74 ms
To double check the proxy configuration, login to your Secure Edge account to see if the status of this iNode shows as ALIVE.
Troubleshoot iNode connectivity issues after configuring proxy
Try checking these if you’re having trouble with Edge iNode connectivity after configuring a proxy server:
Make sure the proxy server has an Access Control Rule (ACL) to enable HTTPS traffic.
Check the proxy server's access log to make sure following URLs are passing through:
https://checkip.amazonaws.com
https://index.docker.io/v1/
https://nodev3.iotium.io
https://registry-1.docker.io
https://auth.docker.io
https://production.cloudflare.docker.com
https://gcr.io
https://storage.googleapis.com
https to remote networks
https to your container image registry (if you have custom services running on the iNode)
Clear the proxy configuration
If you want to remove the proxy configuration, follow these steps:
To clear the proxy server configuration, use the unset proxy command to enter the proxy command mode:
Shell
> unset proxy
(unset proxy) >
Use the server command in proxy command mode as follows:
Shell
    server [PROTOCOL]

DESCRIPTION:

    A proxy server is a server that acts as an intermediary for requests from a
    client (this device) and a server (resources that this device accesses) on
    the internet.

    Use this command to unset a proxy server configuration.

    It is sufficient to provide only the protocol scheme for this command.


    To delete/unset a HTTPS proxy server:
        server https


**** This command requires a SYSTEM REBOOT to effect changes. ****
Use save command to save the proxy to be cleared:
Shell
(set proxy) > save
*** Proxy config saved ***
*** Do a SYSTEM REBOOT to effect the changes ***
Exit the proxy command mode:
Shell
(set proxy) > exitReboot the node for the proxy change to take effect:
Shell
> rebootFor example:
Shell
> unset proxy
 (unset proxy) > server https
(unset proxy) > s
*** Proxy config saved ***
 *** Do a SYSTEM REBOOT to effect the changes ***
(unset proxy) > q
> reboot
Once the iNode reboots, all the configured proxy server settings are cleared.
To verify that the proxy configuration is cleared, use the following command:
Shell
> httping --count 5 http://www.httpbin.org
PING www.httpbin.org (52.73.47.183), Method: GET, DNSLookup: 0.0025 ms
HTTP Response seq=0, request canceled while waiting for connection (Client.Timeout exceeded while awaiting headers)
HTTP Response seq=1, request canceled (Client.Timeout exceeded while awaiting headers)
HTTP Response seq=2, request canceled while waiting for connection (Client.Timeout exceeded while awaiting headers)
HTTP Response seq=3, request canceled (Client.Timeout exceeded while awaiting headers)
HTTP Response seq=4, request canceled while waiting for connection (Client.Timeout exceeded while awaiting headers)

--- www.httpbin.org HTTP ping statistics ---
5 request transmitted, 0 replies received, 100% requests failed
rtt min/avg/max = 0.00/0.00/0.00 ms

 > httping --count 5 https://www.httpbin.org
PING www.httpbin.org (52.73.47.183), Method: GET, DNSLookup: 0.0019 ms
HTTP Response seq=0, request canceled while waiting for connection (Client.Timeout exceeded while awaiting headers)
HTTP Response seq=1, request canceled (Client.Timeout exceeded while awaiting headers)
HTTP Response seq=2, request canceled while waiting for connection (Client.Timeout exceeded while awaiting headers)
HTTP Response seq=3, request canceled (Client.Timeout exceeded while awaiting headers)
HTTP Response seq=4, request canceled while waiting for connection (Client.Timeout exceeded while awaiting headers)

--- www.httpbin.org HTTP ping statistics ---
5 request transmitted, 0 replies received, 100% requests failed
rtt min/avg/max = 0.00/0.00/0.00 ms
In the example, HTTP/S traffic is blocked because the iNode’s proxy configuration has been cleared.
Configure your iNode to Use a Proxy Server with the Web UI
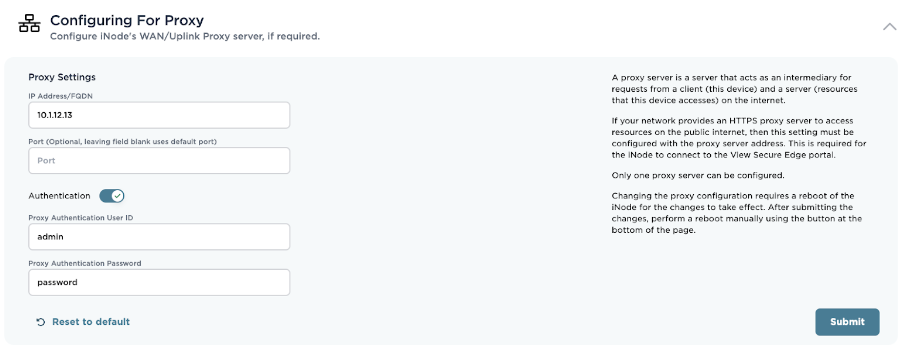
To configure your iNode to use a proxy server using the web UI, follow these steps:
Expand the Configuring for Proxy section.
.png)
Enter the IP Address or FQDN for the proxy.
Enter the port used by the proxy server.
If your proxy requires authentication, toggle Authentication and enter the username and password required for authenticating into the proxy server.

Click Submit.
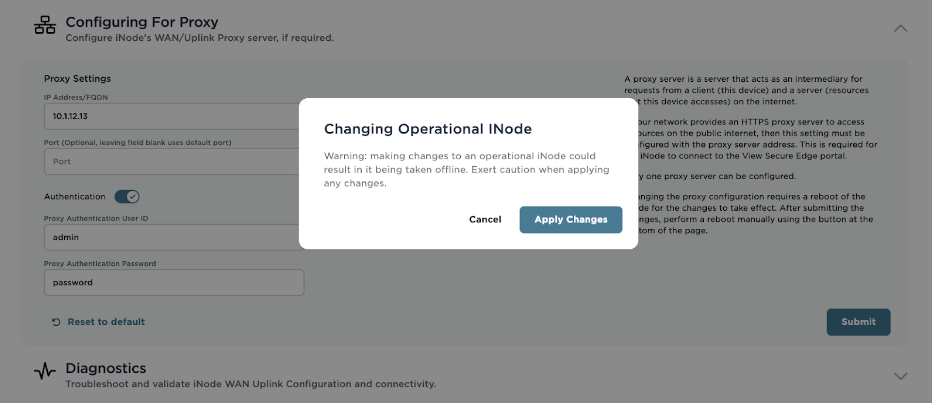
If the iNode is currently operational, you will receive an acknowledgement message. Confirm that you want to apply the proxy configuration changes in the warning dialog.
Caution
Changing the proxy configuration on operational iNodes can cause them to become unreachable.

You’ll need to perform a reboot to save the new settings. Select Reboot at the bottom of the page.
After rebooting, log into the web UI page.


.png)

